One day last fall our neighbour, who has a business installing windows, approached me with an interesting and very challenging project. Apparently he had just replaced a whole hallway of windows for CVI Centennial Vocational High School in Guelph, and because of differing sized openings in the brick, the 14 lower stained glass windows needed to be rebuilt in order to fit into the new spaces.

Since the existing stained glass windows had been designed as a school project, by graduating students over the past 14 years, they present a colourful array of unique designs using the traditional lead kame construction process, as follows:
- strips of lead must be cut to size, fitted around each piece of glass and then soldered at the joints only
- after all lead pieces are in place, putty is forced under each strip using a putty knife
- chalk dust is applied to the entire surface, then rubbed in with a brush in a circular motion
- care is taken to keep the putty under the edges of the lead strips, while the chalk begins to cure the putty and burnish the strips
- the window is left to harden for at least 48 hours
- excess putty is scraped off around every piece of glass
- the window is vacuumed to remove all the loosened putty and dust, then cleaned with windex
Window #1: Grads of 94 - completed Mar 1, 2008
Before | After |
With this prototype window, I approached the job with trepidation because of the many challenges bulleted below. It would actually be almost easier to redo the entire window, and just about as cost efficient, but the client wants to maintain as much of the original window as possible. My goal is to make the changes seamless and incorporate them into the design so they do not look like "add ons."
- when removing the old lead, the hardened putty must be scraped out carefully as the glass can easily break
- it is difficulty tracking down the original glass or finding compatible substitute glass
- challenge of deciding which parts of the glass to replace relative to glass availability, structural issues and design considerations
- need to keep design integrity and flow, within the constraints of a very small border around the outside needing to be replaced
- there is not much area to work with and the window can become weakened structurally
- after deconstruction there is no longer an obvious pattern to follow, so new pieces must be created one at a time, using paper templates and fitting each carefully
- as the project evolves, it is always difficult to keep the window within the proper outside dimensions
- difficulty handling the weakened window after deconstruction; sometimes I have to hold the entire wobbling window while trying to grind off parts of pieces that are still puttied in place
For Grads of 94, I discovered that the turquoise background glass is no longer made. With this I made the design decision to replace the gold rippled glass on three sides, leaving the top edge intact. Borders needed to be created at each end and extra leaves had to be inserted into the water-bed to stretch out the design. Pieces of glass that were wider at the top edge had to be broken before removal and then new paper pattern pieces created. The window took 11 hours to complete and to my delight, maintained design integrity and strength.
The window was delivered to the client in March and approval was given for me to complete the job. I was thrilled that I was able to actually accomplish the job and am looking forward to the challenge ahead. As you will see in the ensuing windows; each is a unique puzzle to be solved. Oh yes, I do like challenges.
Window #2: Grads of 95
Before | After |
- a small purple border was on the top part of the side ends to tie in with the sky
- then the pieces from the bottom row of water were removed and blended together with another shade of blue to create an additional row of water, thus increasing the height of the window
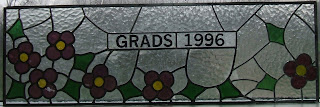
Window #3: Grads of 96
Before |  After |
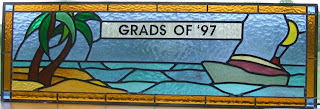
Window #4: Grads of 97
 After |
- the narrow rust coloured border which was created around the outside of this piece frames the island scene nicely and enhances the original design
- I was able to find one small piece of blue hammered glass, just enought to tie in the corners
Window #5: Grads of 98
 After |
- this was the last window I completed as it was the most challenging
- it was one of the two windows that had been done in foil rather than lead work so was much harder to take apart
- the original window had several large cracks so the centre sky panel and the moon had to be removed as well
- the antique seedy blue sky glass that had stars etched on it, was impossible to replace
- luckily I was able to locate a small piece of glass that matched the ground on the left, so I created rocks in the cracked area
- the cracked moon was replaced but in a milky rather than a solid white glass
- a purple border was added, in an attempt to pick up some of the purple hues throughout this rather eclectic piece
- since I was concerned that the narrow foil border might not be structurally sound, I added in some green blobs as an overlap betweent the border and the inside part
- if you look carefully you will see a little bug on the ground and the painted and kiln fired angel was designed by a grad student from an earlier year
Window #6: Grads of 99
 Before |  After |
- if you enlarge this window you will notice dancing figures in the background
- a second border was added to enlarge this window and I found a lovely piece of turquoise green stripped glass that ties in with some of the internal pieces
- when the outside lead was removed from this piece, the window was a very crooked rectangle so it was very difficult to hold the original window up the grinder and try to even it up before adding the border
Window #7: Grads of 2000
Before | After |
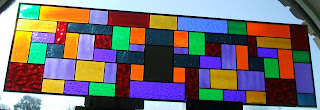
- modelling from the original geometric bar design, I was able to enlarge this window by putting borders on the bottom and both ends; so in essence I only had to replace 3 sides
- found a German antique glass that is almost the same colour as the glass behind the writing
Window #8: Grads of 2001
 Before |  After |
- this is the only other window that was done in foil rather than lead
- the zinc metal around the outside was very difficult to remove
- I was able to locate several pieces of glass that were the same colours as the original pieces, but not the same texture, though some of the textures were the same but just occurring in different colours
- created a new border of various sized rectangles along the top and the right hand side only
- Grad year writing is on a mirror which is now slightly off centre, but not noticeable because of the way colours were chosen for the new rectangular pieces
Window #9: Grads of 2002
 Before |  After |
- added a solid white border all around the outside
- this simple addition seems to really enhance the original design and picks up from the crested wave theme
- once the original lead was removed from the outside, the rectangle was very crooked; this required a double seam in the upper right corner area
Window #10: Grads of 2003
 Before |  After |
- since there were no cracks in this window and since the background pieces were too large to remove, without redoing the whole window, I found a solid mauve glass that blended well into the design and created a simple, narrow border around the entire outside of the window
- adding corner pieces made the window stronger and making them a clear mauve, almost the same as the large swirls, tied the work together
- it was a challenge to make the rough edges from under the lead border balance, especially on the left side
- I was nervous that the narrow border would not be strong enough since the line is continuous with no overlapping pieces of glass which normally add structural strength
- however the piece remained sound and the new border added character
- this piece should be handled with care because of the long seams
Window #11: Grads of 2004
 Before |  After |
- there were bad cracks in the white band across the centre but not on the name panel, so this necessitated removing that band
- I was able to find a clear antique mauve glass, almost the same as the backgroung glass
- I added a band to the right hand side to widen the piece, then a second band below the white band to increase the height
- the glass used in the new band was an interesting fractures and streamers glass containing green and mauve chips
- I felt this gave the window more interest and character as there was already too much mauve and white; a third colour was needed
- then I replaced the lower border with the same mauve glass as that used in the right corner band
- the wing tip on the bird also needed to be redone and extended
Window #12: Grads of 2005
 Before |  After |
- a solid orange border was added around the outside, making a tie in as well as a contrast to the interior orange colours
- since the original outside lead was very wide, there was a half inch area at each seam that did not have any lead there, so each of these seams had to have small pieces of lead added in before attaching the border
Window #13: Grads of 2006
 After |
- added a border all the way around in greens and yellows
- this enhanced and framed the design effectively
- the bottom centre brown rippled piece of glass had a crack so a seam was created where the crack was
Closing Comments
The windows were completed by June 17, 2008 and it took 125 hours of labour and about $600 in materials. It was quite a process handling these large windows and juggling them around choosing colours to match and trying to hold up entire windows to the grinder. Normally you just grind piece at time before they are soldered or leaded together. Each window had to be puddied and then left to dry for three days while the whiting helped the setting process. The dust was vacuumed off the window and the puddie was scraped off several times to remove the overflow that was adherring to the glass. The windows also needed to be washed and windexed and polished. I worked on four at a time so our neighbour could deliver finished windows to the school regularly and there was less to work around in my studio.
It was a fun project and I feel that I accomplished my goal of rebuilding windows in a way that integrated the orignal design without compromises.


2 comments:
Nanci:
What an amazing feat! I loved how you kept the integrity of each piece, and also loved getting the information about your design decisions. You really should send the whole article to a stained glass magazine (I'm sure there is such a thing?) In the meantime, I hope I have your permission to show it to all my glass cutting friends and also the rug hookers who would certainly gain from the design elements.
I know it's harder to do something like this than to start from scratch. Beautiful work. Congratulations!!! I am totally impressed. If you were still in Ottawa, I'd sign up for lessons today.
Joan Shouldice
p.s. Tried to add this as a comment, but didn't want to be a blogger. Add it if you can. (So I added this for Joan) You must send the article out though. It's wonderful!
Hi Nanci:
I am truly awe-struck by the magnificent task you have performed in restoring these windows.
You should be indeed proud of these beautiful pieces of art.
Sheila Barkley
Post a Comment