Renovating our kitchen was NOT something we had thought about doing but when our daughter Amber suggested that we get our kitchen redone while she is working in that field, she planted a seed that made a lot of sense. She offered to do much of the job at cost, which would be a huge savings. It would be an adventure for her to be in charge of an entire kitchen herself and since she has the tools, the skills and the backing of Elmira Kitchen and Bath the time was now because she is going back to school in September. This turned out to be an offer we couldn't refuse as the pros outweighed the cons. Why this generous offer? Amber loves us and wanted to show her thanks for all we have done for her over the years.
Check out the final photos of our newly renovated kitchen but read further if you'd like to learn about what was before and the adventure we experienced during the process.

Check out the final photos of our newly renovated kitchen but read further if you'd like to learn about what was before and the adventure we experienced during the process.
So step one was going through the house trying to unclutter, pack
up, sort, sell, pitch a lot of stuff we don't need and aren't using. Arthur and I had been talking about doing that for years so now was the chance to put our cards on the table. So a grand clean out ensuded and we listed many items for sale on kijiji and joined in the the Elmira community wide May yardsale weekend. Neither of these venues worked out well, but we did manage to part with a lot of treasures and junk... a good start indeed. One was my much loved but never used piano and another was the old kitchen cupboards. Take a look at our thirty year old kitchen. It was tired and outdated and the finish was getting quite worn. We had never thought of parting with it since it was a solid wood and good quality kitchen but honestly, it is cheaper to replace it than restore it and the design of it was very poor.
So check out this link to see photos of our old kitchen before the renovations began.

Step two was the design work. This was worked out over the course of a month in consultation with Amber and by viewing 3D work ups she developed in a special computer program. Here are a couple of sample working plan drawings.


As project manager Amber she did the design work, ordering of materials and doors, assembling and spraying all the cupboards in their shop etc. This had to be done after hours and on weekends around other jobs being done in her shop. She guided us in making many decisions along the way such as design layout, cupboard colour and profile, hardware, type of sinks, tap choices, counter tops, lights, Lazy Susans, towel racks, spice racks, appliance cupboards, type of hinges, self closing doors and appliance placement. She also arranged for cupboard installation and did follow up on trim work and other fine details.

 Arthur helped her build the boxes in the shop but his main job was getting the house ready and doing all the grunt work.
Check out the old guy at work and our son in law Matt helping out.
In the process we had to replace a huge floor (hall ways, bathroom, laundry room as well as kitchen). He had to remove everything, scrape up linoleum, take out fridges, stoves, freezer, washer, dryer, toilets bathroom counters, move plumbing and electrical around, remove kitchen cupboards, remove sand and refinish base boards and do the kitchen back splash. Along the way we also ended up scraping off old wallpaper and painting. It has been a huge amount of work and hard on old bodies.
For the floor we ended up with engineered Congoleum Duraceramic tiles that are actually grouted so look like ceramic but don't have the hardness
or coldness. Our goal was to keep the kitchen area as light as possible but have a floor that matched the cupboards and counter top without taking away from them. The floor looks terrific, matches well and does not show the dirt. However I would not buy this product again because it has a matt finish that does not allow things to slide on it. Thus it is hard to move chairs in and out and also push the mop!!! I hope it lives up to the wear and tear the product promises. It was a very hard choice and a big one.
Once the floor was laid, then the cupboards that were prepared in Elmira Kitchen and Bath were delivered and placed in the kitchen, ready for the cupboard installer. As you can see the cupboards are built as boxes then the door faces are attached. We had to order hardware and handles for 55 doors so it is no surprise that they filled up the whole floor area and spilled over into the living room. You will notice the newly installed Congoleum flooring in the first photo.

You might wonder what those black things are sticking out from the cupboard boxes? They are feet that can be adjusted to help level the cupboards which were set in place the next day by the installer. The new fridge and stove also arrived the same day so the lower kitchen was in place ready for the granite people to come and measure up for the counter top which then took about 10 days to prepare.

We had to batch it for about 3 weeks during the time from when the area was gutted to the final plumbing and electrical hook ups. During this time several the floor was laid, the wiring and plumbing were moved, the dry wall was cut and replaced, the cupboards were installed, the granite counter and upper cupboards were installed, the trim work was completed and the sink and taps were installed. For a time there was no water on the first floor or toilet. At one point I was cooking supper in 5 different places; camping stove in garage, BBQ outside, hot water in bathroom, cold water in kitchen, dishes and food in the dining room. With stuff packed away it was hard to find things. The furniture was piled up everywhere. Sometimes it felt like we had bitten off a bit more than we could chew but I now have a much greater appreciation of what is involved in this process and what Amber does at work. Our dining room became our kitchen and headquarters of operations. We used parts of the old kitchen before selling it on kijiji.

There have been tons of decisions to make along the way. It was quite a challenge to find a granite counter top that would work.... not too dark or too light.The one we chose is called Ocean Storm. It has a lot of green and many interesting colours and quartz in it..... looks gorgeous. It was pretty much a guessing game whether this would match the tiles and the cupboards. It was pretty exciting watching the team install it.


Every time we turned around there were more decisions to make and more work to do. I can't count how much research had to be done and how many trips we made to town. Another huge element was timing everything, placing orders so the products arrived in a timely fashion for the next step in the process.
We chose a stainless touch faucet that looks like a swan. It has a magnetic pull up for the double spray tap. We chose double sinks that are the same size. It was interesting to discover that these sinks become an inch and a half deeper because of the thickness of the granite.
We chose a three tiered spice pull out rack unit to go beside the stove. I love, love, love it. There is a huge tray rack over the fridge, a pull out appliance cupboard where the old stove used to be, pull out trays for canned goods and many big pot drawers. Another thing I love, love, love is the pull out, no smell, garbage pail.
There is an upper and lower Lazy Susan in the corner cupboard. The door area has been made as wide as possible for easy access and the lower door swings right back so you can easily use the Super Susan. The cupboard doors are all self closing and quiet closing. We built in the stereo system as well as the microwave. The goal was to create as much storage space as possible and get all the junk off the counters.
Another goal was to keep the kitchen modern, light, airy and easy to maintain. One of the things we did to make the kitchen pretty was install a lighted, glassed in china cabinet that faces down the hallway so it is the first thing you see when you come in and walk up the hall towards the kitchen. It has German antique glass in the doors and several glass shelves.
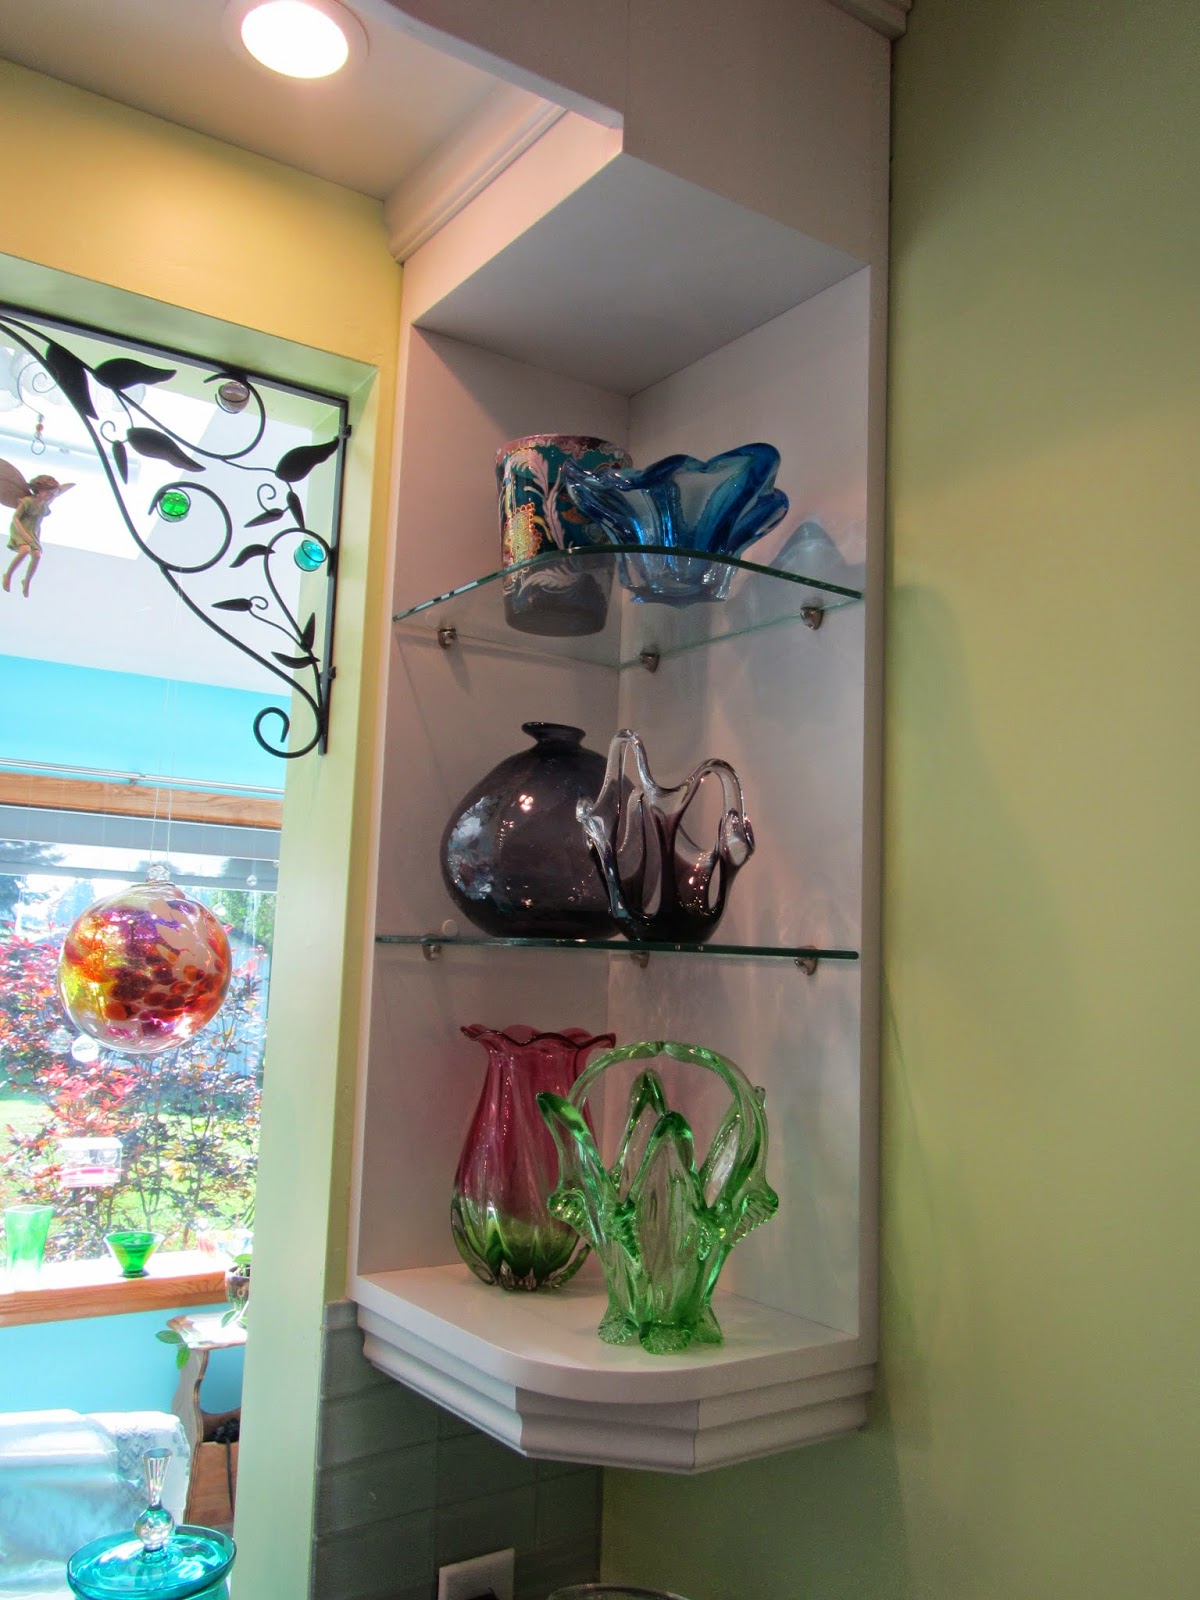
Another thing we did to make it pretty was create a small open glass shelf area to display some of my glass collection.
The final step to beautifying the kitchen was choosing a back splash that enhanced but did not take away from the incredible granite counter top. I had trouble parting with my turquoise glass block backsplash which is shown in the old kitchen photo so ended up with glass blocks again. However the new ones are very soft with just a hint of colour. Arthur installed them used a new grout that brings in the light.
Speaking of lights, something else we had to choose. In the pass over area we installed some life time lights that will never burn out. They produce a white light and are on a dimmer switch. Installing the lights under the counter was the final step.
The final step to beautifying the kitchen was choosing a back splash that enhanced but did not take away from the incredible granite counter top. I had trouble parting with my turquoise glass block backsplash which is shown in the old kitchen photo so ended up with glass blocks again. However the new ones are very soft with just a hint of colour. Arthur used a new grout that brings in the light.
You can see how one thing led to another and grew into a much larger project .... as renovations often go. We now have a new laundry room sink and rugs in our living room. The entire first floor has been repainted and out went the final old wallpaper border in the two upstairs bedrooms which were also repainted.
The renovation has made a huge change in the house which we will get to enjoy, hopefully for several years before we have to sell... and then it will help sell the place. It has brightened up and modernized our dark kitchen. We find ourselves wanting to hang out in there and soak up the ambiance.
We owe a huge thanks to Amber who did so much of this work for us. It sure was nice to welcome people to our home when she got married this August. And of course Arthur used so many of his skills as well. Both of them gave up many more hours of their time than they originally expected. As for me, well maybe I can take credit for some of the creative part, for totting and carrying, packing and sorting, organizing, decision making, taking photos and writing this not so wee piece of prose.

We enjoyed the journey and hope you did too.
So again, here is the final product, newly renovated kitchen if you missed the link to them at the beginning of this article.
Once the floor was laid, then the cupboards that were prepared in Elmira Kitchen and Bath were delivered and placed in the kitchen, ready for the cupboard installer. As you can see the cupboards are built as boxes then the door faces are attached. We had to order hardware and handles for 55 doors so it is no surprise that they filled up the whole floor area and spilled over into the living room. You will notice the newly installed Congoleum flooring in the first photo.
You might wonder what those black things are sticking out from the cupboard boxes? They are feet that can be adjusted to help level the cupboards which were set in place the next day by the installer. The new fridge and stove also arrived the same day so the lower kitchen was in place ready for the granite people to come and measure up for the counter top which then took about 10 days to prepare.
We had to batch it for about 3 weeks during the time from when the area was gutted to the final plumbing and electrical hook ups. During this time several the floor was laid, the wiring and plumbing were moved, the dry wall was cut and replaced, the cupboards were installed, the granite counter and upper cupboards were installed, the trim work was completed and the sink and taps were installed. For a time there was no water on the first floor or toilet. At one point I was cooking supper in 5 different places; camping stove in garage, BBQ outside, hot water in bathroom, cold water in kitchen, dishes and food in the dining room. With stuff packed away it was hard to find things. The furniture was piled up everywhere. Sometimes it felt like we had bitten off a bit more than we could chew but I now have a much greater appreciation of what is involved in this process and what Amber does at work. Our dining room became our kitchen and headquarters of operations. We used parts of the old kitchen before selling it on kijiji.
There have been tons of decisions to make along the way. It was quite a challenge to find a granite counter top that would work.... not too dark or too light.The one we chose is called Ocean Storm. It has a lot of green and many interesting colours and quartz in it..... looks gorgeous. It was pretty much a guessing game whether this would match the tiles and the cupboards. It was pretty exciting watching the team install it.
Every time we turned around there were more decisions to make and more work to do. I can't count how much research had to be done and how many trips we made to town. Another huge element was timing everything, placing orders so the products arrived in a timely fashion for the next step in the process.
We chose a stainless touch faucet that looks like a swan. It has a magnetic pull up for the double spray tap. We chose double sinks that are the same size. It was interesting to discover that these sinks become an inch and a half deeper because of the thickness of the granite.
We chose a three tiered spice pull out rack unit to go beside the stove. I love, love, love it. There is a huge tray rack over the fridge, a pull out appliance cupboard where the old stove used to be, pull out trays for canned goods and many big pot drawers. Another thing I love, love, love is the pull out, no smell, garbage pail.
 |  |
Another goal was to keep the kitchen modern, light, airy and easy to maintain. One of the things we did to make the kitchen pretty was install a lighted, glassed in china cabinet that faces down the hallway so it is the first thing you see when you come in and walk up the hall towards the kitchen. It has German antique glass in the doors and several glass shelves.
 |  |
The final step to beautifying the kitchen was choosing a back splash that enhanced but did not take away from the incredible granite counter top. I had trouble parting with my turquoise glass block backsplash which is shown in the old kitchen photo so ended up with glass blocks again. However the new ones are very soft with just a hint of colour. Arthur installed them used a new grout that brings in the light.
 |  |
The final step to beautifying the kitchen was choosing a back splash that enhanced but did not take away from the incredible granite counter top. I had trouble parting with my turquoise glass block backsplash which is shown in the old kitchen photo so ended up with glass blocks again. However the new ones are very soft with just a hint of colour. Arthur used a new grout that brings in the light.
You can see how one thing led to another and grew into a much larger project .... as renovations often go. We now have a new laundry room sink and rugs in our living room. The entire first floor has been repainted and out went the final old wallpaper border in the two upstairs bedrooms which were also repainted.
The renovation has made a huge change in the house which we will get to enjoy, hopefully for several years before we have to sell... and then it will help sell the place. It has brightened up and modernized our dark kitchen. We find ourselves wanting to hang out in there and soak up the ambiance.
We owe a huge thanks to Amber who did so much of this work for us. It sure was nice to welcome people to our home when she got married this August. And of course Arthur used so many of his skills as well. Both of them gave up many more hours of their time than they originally expected. As for me, well maybe I can take credit for some of the creative part, for totting and carrying, packing and sorting, organizing, decision making, taking photos and writing this not so wee piece of prose.
We enjoyed the journey and hope you did too.
Sample lines
|
Sample table no lines
|
Sample table no lines
|
SAMPLE TABLE TWO CELLS
put text here
|
put text here
|
SAMPLE TABLE ONE CELL
put text here
|